Weeks Ten, Eleven, and Beyond: Lumion! Rendering Images and Post-Processing in Adobe Photoshop
by: Anna Tiburzi
Welcome back!
Last we spoke, we were neck deep in SketchUp, frantically modeling to our heart’s content. Today, we talk about Lumion, which is a program with different strengths entirely.
While SketchUp shines in 3D modeling, giving the user the ability to push, pull, drag, and draw to create shapes and surfaces as desired and apply material textures to the faces of the model, it’s limited in how you can show your model as far as lighting, textures, and atmospherics. Lumion, on the other hand, is a visualization and rendering program designed to do just this. In Lumion, you can’t draw and make changes like you can in SketchUp, but you can add more detailed textures, better objects (such as trees, rocks, people, flags, and even whole buildings), and contextual terrain changes. It also features a scenes workspace where the user can set up vantages, like through the lens of a camera, and apply filters and effects in order to change the mood and atmospherics of the scene.

To start, it was important for the repeat photography vantages that all six models be in the same position. Lumion allows the user to align models or objects based on their origin point, so this was the first step after importing all the period models into Lumion.
Aspects like terrain can also be manipulated, changing the default terrain (grass) to ocean, in order to better place Liberty Island in context.

In previous posts in SketchUp, I mentioned the importance in isolating the paths in each of the models and applying the material textures. All that is still relevant here. Those isolated textures can be replaced in Lumion with more detailed and, generally, better looking textures in the Lumion material library. However, we’re not limited to Lumion’s textures – we can make our own.
During the site visit back in July, we took a lot of pictures of the island for the update report, for references in modeling, and for textures. I was able to take some of those images and create what are called seamless textures. Textures, in this case, are made up of image files that are just tiled over and over again. Seamless just means you can’t tell where the tiles begin and end – their seams match up with the one next to them, creating a smooth material surface.
From our site visit, I created seamless textures for the fort wall, coping stone, interior terreplein wall, concrete pedestal base, pedestal wall at the terreplein, the two different terreplein surface pavers and stones, and the seawall. Now, these surfaces in the model reflect the actual textures they have in real life. It might not be necessary to do this for all materials on a site, but for ones that may be more important or critical, using the real texture is always better than a generic one.
As amazing as the Lumion library is, it doesn’t have every tree or shrub or object in existence and those that is does have, sometimes don’t match the character of the element I’m trying to place – trees come in all shapes and sizes, even when they’re the same species. For some of the trees, matching the species worked great – the tree was the right one and it had the right look. For others, either the species didn’t exist in the library or the one that did exist didn’t look the way I wanted it too. In these cases, I placed another tree of a different species, one that better matched the character and look of the ones in the historical photographs. While it would be nice to have all the trees be the right species, getting the feeling and character of the place and scene took precedence. Which is why, in some of the models, I also added more trees than the original models indicated, making them look younger or more mature based on the historical references which showcased a much more dense or varied character.
Another feature Lumion offers is adjusting object transparency from 0% to 100%. For Liberty Island, in the 1956 and 2019 models in particular, the quantity and size of the trees on the island obscured a lot of the island’s detail and, in some vantages, began to overwhelm the image itself. By reducing the opacity of the trees to 50% however, they become too light and we lose that sense of mass and cover. We eventually settled on about a 20-30% transparency for a mostly solid look that lightened the overall presence of the trees in the scenes while still maintaining that sense of mass vegetation.
 Even with just materials and trees placed, you can start to get a better feel for the models as they become more detailed and realistic than they had been in SketchUp.
Here you can also see how you might change your materials over time, as we did with the grass texture between 1937 and 1956. This we did in response to the changing ownership of the island, from when it was run as a military base by the war department to when it was operated as part of the Statue of Liberty monument by the National Park Service.

Lumion offers a variety of preset styles, as well as the possibility to create any number of combinations of effects for a custom setting and mood from more realistic to styles that emulate a blueprint, watercolor, or pencil sketch. There’s infinite options really for how you could choose to show your render, and what you choose is determined by your intent and what you’re trying to show with your image.
We had a lot of details we wanted to show and so we decided to go in a more realistic direction, setting our scene at an earlier time of day to get more dynamic shadows and a softer, warmer light quality.

Now, it’s important to note that, while I don’t particularly mention any progress in SketchUp in this post, that doesn’t mean no work has been done doing further modeling in that program. Once the models are in Lumion, changes can be made in SketchUp and the models can then be re-imported into Lumion. As long as the file name hasn’t changed, those material changes, object placements, or scene set ups will be maintained.
To place the island a little more into context, I worked on developing a generic skyline background for each of the vantages. Lumion has an application called Open Street Map, in which you can pinpoint your location and Lumion will draw up the surrounding land areas and building footprints, which can be raised up or down to their approximate height.
If we go back into the scene setup workspace and apply a blueprint style, it gives the scene an outline look. This image can be rendered and brought into Adobe Photoshop to be traced and filled, creating a basic skyline silhouette.
Unfortunately, based on Liberty Island’s location, one single grab in Open Street Map wasn’t enough to cover all of the required background skylines, so I had to move that circle and render four different portions of skyline for each vantage. These I brought into Photoshop, reduced to 50% opacity so I could see them all at the same time, and traced and filled them in.

Whether you leave the outlines as a trace, semi-transparent blurred fill, or solid fill, the effect is a general skyline that adds a little more context to our model. We ended up going with a slightly transparency blurred fill, getting a more solid look but one that is less visually dominant – adding context without distracting from the image subject itself.

Other changes can be made in Photoshop too at this point, using the tools available to emphasize certain areas, lighten the image, or clean up any inconsistencies. Once you’re done in Photoshop, you have the final renders.
Final Renders
Now we’ll take a look at some of the final renders to come out of the project.
The goal of the vantage below is to demonstrate changes in the spatial organization of the island as the years progress. In it, you can see how the island’s edge changes over time as the island expands, or how the circulation paths and building concentrations have evolved through the years.


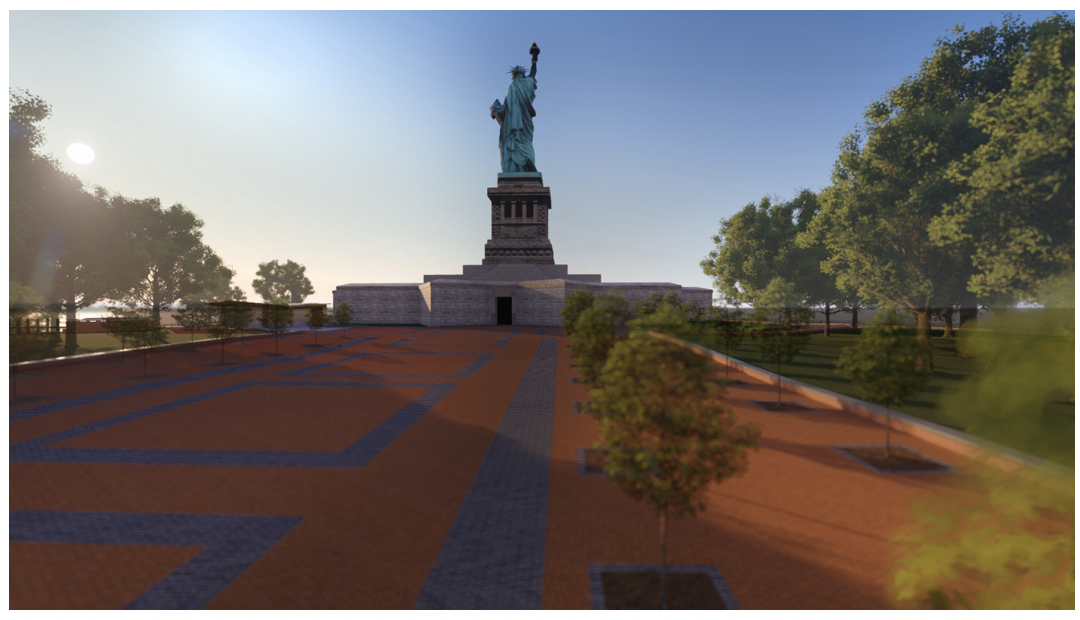
There are 8 vantages total, but I’m only including one more today. In this last vantage, the goal was to highlight that view at the end of the entrance axis to the flagpole and beyond to the city skyline in the 1956 and 2019 models. However, another great aspect that this vantage gives you the opportunity to get a closer look at, is how the island changes in the foreground.
In the earlier models, the water laps right up onto the island’s surface. This is because, at these points in time, the seawall hadn’t yet been constructed for this area of the island. As the year’s progress, the island’s surface is expanded and the foreground fills in.

Immersing myself into the models, from 1840 and on, to visiting the island in the present day has been such a unique and rewarding way of learning about Liberty Island. There’s only so much that can fit into a blog post, but I’d like to note that all of these programs that I’ve used – AutoCAD, SketchUp, Lumion, and Adobe Photoshop – are programs that I just became familiar with in the past year. The workflows I’ve described in these past five posts are just the techniques I’ve used to get from 2D plan to rendered image, but they’re ones that can be applied to any number of other projects or sites should you have the time or opportunity to explore these programs.
What’s left is finishing up the remaining vantages and any last modeling changes – there are 8 total and across six models that really adds up. The process for the rest will be similar – adjusting the Lumion scene and styles, rendering the images, developing and adding the skylines, and finishing up the last touches in Photoshop. As that process will be an echo of this post, I won’t go into any further detail on their process.
As I close, I’d like to give one last thank you to all the members of Team Liberty at SUNY ESF and at the OCLP in Boston – so thank you Aidan Ackerman, Julia Miller, Eliot Foulds, and Bob Page, for all your support, contributions, and guidance throughout the summer and as we move into the final stages of the rendering phase.
And thank you to any readers, friends, and family, who spent the last three months listening to me talk about the island’s materials and walls and stairs (a lot). It’s been an amazing opportunity and I’ve loved having the chance to share it with you all!
